How to Make Art Prints for Etsy

I’m a self-taught artist who loves sharing tips and tutorials for painting with watercolor and gouache, and using the Procreate app on the iPad.
Learn how to make art prints for Etsy. Get tips for creating art prints to sell, whether you want to sell physical copies or digital downloads.
You might also like this post on creating digital downloads for Etsy.
This post contains affiliate links. By purchasing an item through an affiliate link, I earn a small commission at no extra cost to you. As an Amazon Associate I earn from qualifying purchases.
I recently experimented with adding art prints to my Etsy shop. Although I would love to say that it’s a huge success, I sadly haven’t sold any yet. However, I know that as I add more listings, they will sell eventually.
Patience is key with Etsy!
This process has taught me so much about selling art prints on Etsy, a question that I get a lot.
So I’m sharing everything that I’ve learned so far about making the art, making the listings, and selling them on Etsy.
Art Print FAQs
What are art prints?
Art prints are replicas of artwork (versus selling the original artwork). They can be digital downloads, which means the customers print the files at a cheaper price or they can be physical prints that you package and mail to the customers.
Do art prints sell well on Etsy?
Art prints sell very well on Etsy. If you search art prints, you will see many sellers with more than 1000 reviews, which means that they have had plenty of sales.
What size prints sell best?
That depends on where you live. In the United States, it makes sense for digital downloads to include US Letter size (8.5 x 11″) prints because that’s the standard size for home printers.
In Europe, A4 makes more sense.
If you’re selling digital downloads, it’s nice to offer a few different size ratios.
How to Make Art Prints for Etsy
Competition
There is a lot of competition for art prints on Etsy. I say this not to discourage you, but to encourage you to be as different as possible. Here are some tips to stand out.
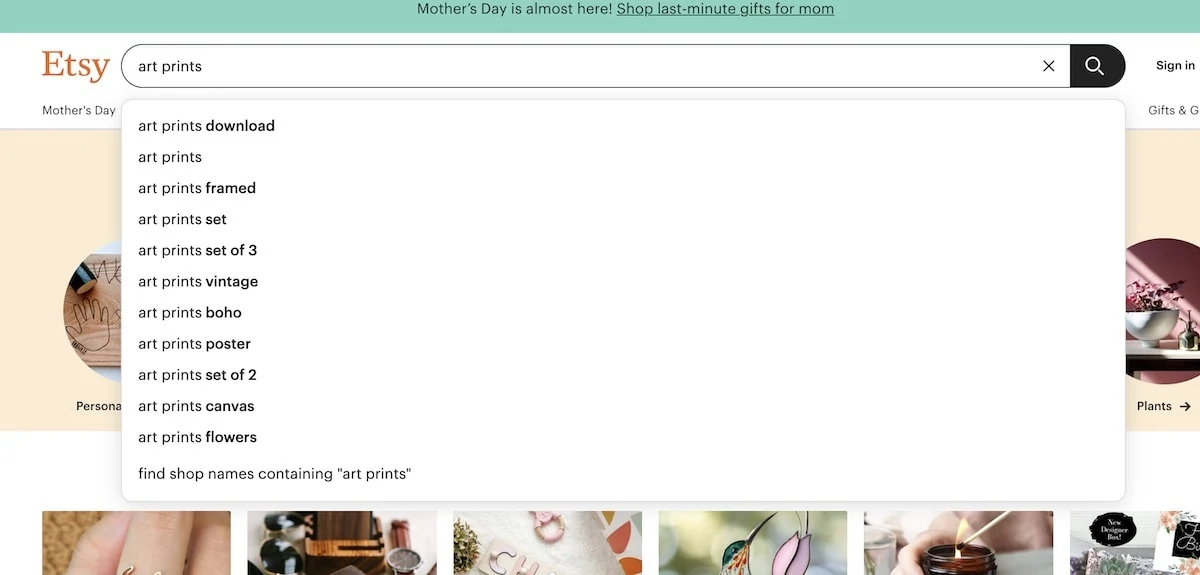
- Do the research and look for areas without a lot of competition. You can use a keyword tool like Erank or you can just search on Etsy and see how many items come up when you search for that term.
- Look at the autocomplete keywords in the search bar and see if any of those apply to what you want to make. These are based on popular searches.

- Capitalize on trends. Pay attention to motifs you are seeing in stores and make your own version. Etsy releases trend reports, so check those out for ideas.
- Target long-tail keywords. Rather than go for “art prints,” target “art prints for baby boys.” Longer keywords mean that the buyer is more serious about buying, which can lead to higher sales. It also means less competition.
- Sell sets. I often notice that many of the best sellers that I see are for sets of art prints. When creating, try to create in sets so that you sell them individually and as a bundle set.
- The more art prints that you have in your shop, the more visible they will be. Try to aim for at least 40, but 100 is better! (See the tip about bundling. This creates additional listings without really making new products…)
Digital Downloads Vs Physical Prints VS Print on Demand
You have 3 options for selling art prints online: digital downloads, physical prints, and print on demand.
Digital Downloads
Digital downloads allow the customer to purchase the print and print it themselves.
Pros:
- Typically easier to make.
- No shipping items!
- Passive income. You make it once and list it, and then sell it over and over again.
Cons:
- Lower price value.
- Can be stolen.
- Higher chance of customer confusion. (Customers often purchase digital items thinking that they are physical items.)
Physical Prints
Physical prints are prints of your art that you ship to the customer.
Pros:
- Can charge more
- More control over print quality
Cons:
- Higher overhead costs to print, package, and ship the items
- Have to store inventory and shipping supplies
- Shipping problems. (Shipping is still a mess right now, so this might be a headache that you want to avoid.)
Print on Demand
Print-on-demand services print the art on items and ship them out for you!
Pros:
- You can sell your art on cool surfaces like phone cases, stickers, pillows, clothing, etc
- A way to offer physical prints without you doing the shipping
Cons:
- Lower profit margin. Since the company does most of the work, they make a larger percentage of the profit. You can raise the price, but you risk being priced higher than usual.
- Harder to offer different levels of shipping for customers
- Integration may not be seamless with some services
Traditional Art
Traditional artwork is made with physical media like acrylics, gouache, watercolors, or other art supplies. This work must be scanned in or photographed to digitize it for selling. (This is necessary even for art prints.)
Tips for Making the Artwork
- Make it big enough to add details, but not so big that it’s hard to scan. (If it doesn’t fit on your scanner, you will need to photograph the art and it’s hard to get the camera straight.)
- Don’t use paint colors that won’t scan well. Fluorescents and perylenes are notorious for not scanning correctly.
- Consider using gouache vs acrylic when possible. The matte texture is easier to scan than the shininess of acrylic paint. There are new versions of acrylic paint available in matte versions!
- Use smooth paper when possible. It will be easier to clean up the image when digitizing than a rough texture.
Scanning the Art
Scanners have come a long way since they first came out. Even a cheap scanner does a pretty good job.
- At a minimum, scan your art at 300 dpi, but 600 or even 1200 dpi will allow you to make the art larger than it is.
- Label everything as you go so that it doesn’t get lost in your computer.
Digitizing the Art
Your art will need to be digitized using a program like Photoshop. This allows you to clean up any stray marks and remove the paper background where necessary. You can also do color corrections and alterations if desired.
This is its own tutorial and will be coming eventually.
Resizing the Art
Remember that when you’re working with Photoshop, art cannot be sized up. It can only be sized down.
Create a file the size that you want and copy the image into the canvas.
Keep the ratio constrained to avoid stretching the art when resizing.
Some ratios just aren’t going to work when resizing. You will either need to crop the art or create the art with white space around the edges to begin with.
Printers can only print to about 8 x 10.5″, but I like to make my designs slightly smaller than this at 7.5 x 10″.
Keep standard frame sizes in mind when creating art.
Digital Art
Digital art is art that is made on the iPad or a computer. It’s already digitized, so you can skip a few steps like scanning.
Work in a CMYK color mode, unless you are making art for print on demand, which mostly requires RGB.
Sizing the Art
When creating your art, make sure that you create it big enough for what you are doing with it. For art prints, you want it at least 16″ x 20″.
(Unless you’re using Adobe Illustrator to create the art. Then it can be resized as much as you want.)
Keep in mind that when using a raster-based program (pixels), your art can only be sized down, not up.
Other Considerations
- Gold foil textures look really cool on computers, but not so much when printed out.
- Colors may look different when printed out. You should always test the colors first before finalizing your designs.
Copyright Issues When Using Paid Elements
This should really be its own post and in time, it will be.
It’s my personal pet peeve when I see Etsy sellers using digital elements incorrectly and selling them as art. It just feels lazy.
Just because a certain popular Etsy course advises you to do this, does not make it right.
And Etsy will shut you down for it. I’ve seen a lot of shops get shut down in the past few weeks for this.
Using Elements the Correct Way
The first thing you want to do is to buy the correct license. You are a business, so you want to buy a commercial license. It’s usually only a few dollars more.
You cannot buy an image and re-sell it as is.
You can use it as PART of your design.
No item should be able to be removed as a whole from your design, so make sure that you layer elements.
Change colors and add your own elements, text, and shapes to make it your own.
Think of a collage. You wouldn’t just use one image and call it a collage. You would use elements from several places, layer them, maybe add some ink or glitter to make it unique.
If in doubt, create your own graphic elements.
For more information on what is okay and not okay, I love this post. (The referenced post used to be way more informative with several examples of what is okay and not. There is still one example, but it’s a pretty good one.)
Selling on Etsy
You’ve made your art, now comes the fun part of listing your items on Etsy.
Haven’t started your Etsy shop yet? Sign up today and get 40 free listings!
Images for Selling
Mock Ups
Using mockups is the easiest way to sell printable art (unless you’re a really good photographer…)
There are 2 types of mock ups.
The first type is a JPG file where you lay your image over the top of the existing image. So for digital art, you would just resize your art and place it over a frame.
This type of mockup is super easy, but not always the most convincing.
The second type of mock-up is a photoshop file that uses smart objects. These look more convincing and often include other items to make the photo look more unique. It’s a little harder to learn how to use, but it’s totally doable, even if you’re new to Photoshop.
Use 2-3 different mock-ups to show the art. You can re-use these throughout your shop for a cohesive look.
Stay away from the mockups that are too artsy. If there are excessive palm leaf shadows, it’s probably not a good mockup to showcase your art.
Mockups with too many external elements can be confusing for buyers, so keep them as simple as possible.
Tips for Images
Always crop the image to show the design well. No one is buying the wall, they are buying the art, so it needs to be clear.
If this is a digital download, you need to say it everywhere, including the listing images.
You can also include a graphic that states the sizes that you are including.
If you offer a variety of options in a theme, you can have an image showing all of them. Just be careful to label it so customers don’t think they will receive all of the options.
Get easy tips to resize the photos for your Etsy listing.
Sizes to Include
You can create a variety of listings, but personally, I want to keep it as simple as possible. I offer 3 sizes.
Most of my customers are in the US, so my sizes reflect that.
- 5:7 ratio for a 5 x 7″ print.
- 11:14 ratio for an 11 x 14″ print
- 4:5 ratio for 4 x 5″, 8 x 10″, and 16″ x 20″ (This size works with standard home printers.)
Packaging Digital Downloads for Etsy
Place all of the images in a single folder that is labeled with the name of the product.
Then place each size in its own labeled folder inside of the first folder.
Compress the main folder into a zip file to upload to Etsy.
Etsy allows you 5 files that are 20MB each. If necessary, split the files into separate zip files to upload them.
If more space is needed, you can upload the file to google drive or drop box. Then get the sharable link.
Create a PDF with the link and upload that to Etsy. You can create links in PDFs in Canva or you can use Adobe Acrobat if you have the Adobe Creative Cloud.
Pricing
Pricing is one of the hardest parts of having an Etsy shop. You don’t want to be the bargain bin, but you also shouldn’t have the highest price unless it really is worth the higher price.
Look at the competition and find the lowest and highest prices.
For digital downloads, I try to find a nice spot in the middle.
If it’s a physical product, make sure that you’re covering your materials and time. Then add more for profit.
Refunds
If you are selling digital downloads, you are going to get people asking for refunds when they realize that it’s digital and not physical.
You can try and prevent it as much as possible by writing it in the title, description, tags, and even making graphics for it in the photos, but it still happens.
Just give them the refund. It’s not worth the bad review.
Don’t let this scare you, though. It rarely happens and I truly believe that most Etsy customers are honest and not trying to get something for free.
(If you have a Shopify shop and this happens, check to see how many times your item was downloaded before issuing the refund. I issued a refund on an item and months later noticed that it had been downloaded 22 times… I have since set a download limit for each item in my shop.)
On Etsy, you can see if it has been downloaded, but even if it has, I still don’t recommend trying to fight over $6. Let it go.
Happy art print-making!
Other Etsy Tutorials
- Naming Your Etsy Shop
- How to Open an Etsy Shop
- Etsy Pros and Cons
- Etsy Shop Image Sizes
- Digital Downloads to Sell on Etsy
Pin for Later!